Technical Information
While we will do our best to assist you, we are unable to guarantee product identification of old flooring or match new flooring to old, due to the many variables involved.
ACCLIMATION INSTRUCTIONS click for details
Prior to Installation, Chelsea Plank Flooring® and Restoration Series Plank® flooring needs to be acclimated to the environment of the installation site. Proper acclimation and installation work hand in hand to ensure the beauty of your plank floor upon completion and for many years in the future.
PURPOSE
Hardwood flooring is hygroscopic. This means the moisture content of your plank floor will increase or decrease with changes in the relative humidity of the installation environment, both before and after installation.
If the moisture content of the planks increases, they will expand in size. Conversely, if the moisture content of the planks decreases, they will contract in size. The purpose of acclimation is to expand or contract the size of the planks to best match the current and future installation environment, prior to the installation. As such, there is no pat answer for how long plank flooring should acclimate. Successful acclimation should be job specific and include a good measure of common sense.
HUMIDITY CONTROL
The Frame Industries manufacturing facility is maintained at a relative humidity ranging from 35 to 60%. Ideally, the installation environment will be maintained at the same humidity range. Please be aware the installation environment includes the immediate living area as well the space located directly below the living space to include basements and crawl spaces. To maintain the 35 to 60% recommended relative humidity, Frame Industries suggests installation and use of the following equipment:
To prevent relative humidity levels above 60%:Air conditioner (of proper size and in working order)
Dehumidifier (if required)
To prevent relative humidity levels below 35%:
Humidifier (of proper size and in working order)
In addition to the above listed equipment, Frame Industries strongly recommends monitoring the installation environment with a hygrometer to ensure proper relative humidity levels are maintained.
ACCLIMATION EXAMPLES
If the installation environment is humidity controlled, acclimation is unnecessary and the plank flooring may be installed immediately.
If the installation environment is not humidity controlled and located in an arid region, allow the plank flooring to acclimate for 7 days. This will allow the planks to shrink in size, preventing future gapping of the floor.
If the installation environment is not humidity controlled and located in a mixed arid region, allow the plank flooring acclimate for 7 days if it is the wet time of the year (above 60% relative humidity). Install the plank flooring immediately if it is the dry time of the year (below 35% relative humidity).
If the installation environment is not humidity controlled and located in a mixed humid region, allow the plank flooring to acclimate for 15 days if it is the wet time of the year (above 60% relative humidity). Install the plank flooring immediately if it is the dry time of the year (below 35% relative humidity).
If the installation environment is not humidity controlled and located in a humid region, allow the plank flooring to acclimate for 15 days. This will allow the planks to expand in size, preventing future cupping and/or buckling.
If the installation environment is not humidity controlled and located in a tropical region, allow the plank flooring to acclimate for 30 days. This will allow the planks to expand in size, preventing future cupping and/or buckling.
The examples listed above are for reference only and do not cover all possible applications. If you have additional questions or concerns, please contact Frame Industries, Inc. at 734-433-1023.
INSTALLATION INSTRUCTIONS click for details
This installation guide is intended to aid in the installation of Chelsea Plank Flooring® and Restoration Series Plank® flooring. In addition to this guide, installation should be performed in accordance with NWFA and NOFMA installation standards for 3/4" hardwood plank flooring.
CONSIDERATIONS
General: First, it is important to determine the intended installation space is suitable for a quality plank flooring installation. The primary rule of hardwood flooring is that wood and water don't mix with water defined as any type of moisture from standing puddles, to the moisture content of the subfloor, to the current and future humidity levels of the space. As such, the intended installation space must be fully enclosed and environmentally controlled to maintain humidity levels between 35-60%. In addition, unless extraordinary precautions are taken with regard to moisture and humidity, solid hardwood flooring should never be installed below grade.
Location and Life Style: Hardwood plank flooring is extremely versatile and depending on the specie, lumber cutting technique and plank width may be used in applications ranging from summer lake cottages in the mid-west to environmentally controlled living spaces for allergy sufferers. That said, some floor styles may work well for the intended installation space while others may not. Disregarding the natural tendencies of the different types of plank flooring strictly for design consideration may cause disastrous results. Thoroughly discuss your living space requirements with the sales person prior to selecting your plank floor style. Marriage of design and practicality is key to a long lasting floor and happy owner. If you are concerned with your application, please contact Frame Industries at 734-433-1023 for assistance.
New Construction: When installing hardwood flooring in a new structure, moisture emissions from concrete, drywall and paint cause elevated humidity levels for an extended period of time. Acclimation and installation of the plank flooring should not occur until the relative humidity of the installation space is controlled between 35-60%. Installation of high capacity dehumidifiers is strongly recommended.
INSTALLATION SPACE REQUIREMENTS
Subfloor: The subfloor must be properly secured to the floor joists and flat with no deflection greater than 3/16" over any 10' span. If the subfloor isn't properly fastened to the joists or uneven areas are not corrected the plank floor will squeak and/or become damaged over time. The moisture content of the subfloor at the time of installation must be between 8 - 10%. Higher moisture content may cause dimensional changes to the planks resulting in cupping and/or buckling of the floor.
Suitable subfloor construction
Plywood or OSB
I) Truss/joist Spacing less than 16" on-center
a) 5/8" CD Exposure 1 plywood (4x8 sheet)
b) 23/32" OSB Exposure 1 (4x8 sheet)
II) Truss/joist spacing of 16" to 19.2" on-center
a) 3/4" CD Exposure 1 plywood
b) 3/4" OSB Exposure 1
III) Truss/joist spacing of 19.2" to 24" on-center
a) 7/8" CD Exposure 1 plywood
b) 1" OSB Exposure 1
Solid BoardI) Truss/joist Spacing of 16" on-center
a) 1" x 4 to 6" width, Square edge, kiln dried coniferous lumber
b) The boards must be laid diagonally over the joists
c) The board ends must be cut parallel to the center of the joists
d) The boards must be face-nailed with 7d threaded or 8d common nails
c) The board ends must be cut parallel to the center of the joists
d) The boards must be face-nailed with 7d threaded or 8d common nails
Concrete: Slab - level and cured
a) Requires special adhesive and adhesive application
II) Lightweight (radiant heat) - level and cured
a) Requires special adhesive and adhesive application
Humidity Level and Control: The relative humidity of the installation space must be maintained between 35 - 60%. The relative Humidity should be measured using a hygrometer under the same temperature and humidity conditions in which the installation space will be maintained after the flooring has been installed. Installation of high capacity dehumidifiers is strongly recommended.
Basement / Crawl Space: The basement / crawl space must have effective vapor barriers, ventilation and dehumidification. The relative humidity must be maintained between 35 - 60% at all times. If the relative humidity is not controlled, elevated humidity levels will cause the floor to cup and / or buckle.
Acclimation:
Acclimation is a critical aspect of a quality plank flooring installation. Please read the Acclimation Instructions located above. If there are any questions regard acclimation, please contact Frame Industries at 734-433-1023.
Glue Assist Installation Method:
Frame Industries does not suggest utilization of the Glue Assist installation method for any Chelsea Plank Flooring products, no matter the width. Glue Assist can prevent cupping. However, it does not prevent hardwood from expanding when it absorbs moisture.
We feel cupping is the floor naturally telling the homeowner there is a moisture problem that needs to be addressed. If the source of the moisture is identified and mitigated, mild to moderate cupping will correct itself naturally.
Conversely, if cupping is prevented and the floor is forced to expand laterally, it may cause structural damage. As example, the width of a 20’ wide Hickory installation will expand by 1” for every percentage point of moisture the floor absorbs after installation.
INSTALLATION
1) Set up the "cutting area" in the garage or a job trailer to avoid damaging the installed floor or introducing excessive sawdust to the installation space.
2) You should wear clean, soft soled shoes while installing plank flooring.
3) Use traffic mats and pads to avoid dents and scratches.
4) Clean up dust, nails, cut offs, etc. everyday to prevent damage to the installed portions of the plank floor.
5) Plank flooring should be installed perpendicular to the floor joists. This is necessary to prevent squeaks caused by deflection of the subfloor between the joists.
6) The subfloor must be fastened to the joists every 9" using screws. Per many building codes, the subfloor must also be glued to the joists in new construction.
7) Use a vapor retardant material between the floor and subfloor such as 15# roofing felt or papers specifically designed for solid hardwood flooring installations like All Globe SVS or Aquabar. Do not use red rosin paper, vapor barrier materials or products designed for laminate floor noise mitigation.
8) The planks should be fastened to the subfloor with 16 Gage Powercleats of the correct length for the specific floor construction.
9) The fasteners are driven through the tongue of the plank at a 45° angle with the groove of the next plank covering the fastener.
10) Each plank should be inspected for defects prior to installation.
11) The planks are fastened to the subfloor. Through nailing to the joist is not necessary.
12) The first and last fastener of each plank should be located 3" to 5" from the planks ends.
13) The fasteners should be installed approximately 10" apart.
14) Leave a 3/8" expansion gap between the flooring and wall and any other fixed objects like cabinets and support posts to allow for seasonal expansion.
15) The starter course must be perfectly straight and, for best results, anchored with 2", 15ga finish nails to ensure it does not move.
16) Long planks should be used in the starter course which is typically is positioned next to the longest and straightest wall of the installation space.
17) Start and finish each row with a square ended "cut-off" plank to best utilize the planks and prevent their use in the center of the floor.
18) Prior to fastening, experiment with plank sizes and positions to minimize scrap, blend colors, and ensure the end joint stagger is pleasing to the eye.
19) To complete the plank floor, conceal the expansion gap with base board, shoe mold or trim.
20) Use caution when moving heavy objects over the newly installed plank floor. Small, hard appliance casters and dolly wheels can permanently "track" the floor.
Important Note:
Standard hardwood flooring nail and staple guns should have the "Factory Finished" shoe installed to the tool. The "Factory Finished" shoe shifts the impact of the hammer blow from the beveled edge of the plank to the front of the tongue to prevent plank damage during installation If a "factory Finished" shoe is unavailable, add a thin felt pad to the plate of the gun and avoid using the plate to drive planks together.
Special Applications
Concrete / Light Weight Concrete:
The flat and true milling of Chelsea Plank Flooring® and Restoration Series Plank® is ideal for glue down applications. Installation of plank flooring to concrete must follow NWFA specifications relating to concrete and site conditions as well as the adhesive manufacturer's specifications and instructions. For additional information regarding NWFA specifications and adhesive manufacturers please follow the links provided below.
Radiant Heat: Chelsea Plank Flooring® and Restoration Series Plank® may be installed over radiant heating systems provided the surface temperature of the subfloor does not exceed 85° F (30° C). Installation should be performed in accordance with the heating system manufacturer's requirements. In addition to the manufacturer's requirements, we require the use of a whole house humidification system to maintain relative humidity between 35-60%. This will minimize gapping between the planks and possible grain separation during the heating season.
In most cases, to avoid damaging the tubing of the radiant heating system, plank flooring is secured to the subfloor with adhesive. Check with the manufacturer of the radiant heating system as well as the manufacturer of the adhesive to ensure the two systems will work in conjunction for your application. For additional information regarding adhesive manufacturers, please follow the links provided below.
Glue Assist Installation Method: Frame Industries does not suggest utilization of the Glue Assist installation method for any Chelsea Plank Flooring products, no matter the width. Glue Assist can prevent cupping. However, it does not prevent hardwood from expanding when it absorbs moisture.
We feel cupping is the floor naturally telling the homeowner there is a moisture problem that needs to be addressed. If the source of the moisture is identified and mitigated, mild to moderate cupping will correct itself naturally.
Conversely, if cupping is prevented and the floor is forced to expand laterally, it may cause structural damage. As example, the width of a 20’ wide Hickory installation will expand by 1” for every percentage point of moisture the floor absorbs after installation.
Equipment Sources
Moisture meters:
Delmhorst Instrument
Lignomat USA Ltd.
Wagner Meters
Fasteners:Powernail Company
Flooring Adhesives Sources (contrete applications):
Bostik Inc - Ultra-Set® SingleStep2™ or GreenForce™
Taylor Adhesives - Ridgeline® Signature Line Adhesive
Stauf-USA - Stauf SMP 960 / 940
**The manufacturers / products listed above are suggestions only and should not be construed as endorsements. Please consult the manufacturer for proper application prior to installation**
HARDWOOD FLOORING & WATER click for details
HARDWOOD FLOORING AND WATER
DON’T PLAY WELL TOGETHER
Hardwood flooring is like a sponge, when it absorbs moisture it expands in width and when it depletes moisture it contracts in width.
To avoid the damage associated with expansion (Cupping, Buckling, Compression Fractures) and contraction (Gapping, Checking), you MUST control the quantity of moisture that comes into contact with your hardwood floor.
Expansion is caused by anything classified as “wet”. The list of “wet” items includes but is not limited to:
· Water supply line failures
· Drain line failures
· Sink or toilet overflows
· Heavy or repeated spilling
· Pet urine or drool
· Wet mopping
· Steam mopping
· High humidity level of the living environment
· High humidity level below the living environment
· Flooding of basement or crawlspace
Contraction is caused by anything classified as “dry”. The list of “dry” items includes but is not limited to:
· Low humidity level of the living environment
· Low humidity level below the living environment
HUMIDITY
Improper humidity control is the most common cause of hardwood floor damage. For best results, maintain a relative humidity level between 35-60% (both above and below the floor).
We also strongly suggest the use of a stand-alone Hygrometer even with very sophisticated HVAC systems. We do this for two reasons - 1) A Hygrometer is a good backup to ensure your HVAC system is operating properly. 2) Confusion exists between settings and readings on some HVAC systems.
PLEASE,
DO NOT RUIN YOUR BRAND NEW
CHELSEA PLANK FLOORING!
FLOOR CARE & CLEANING GUIDE click for details
Preventive Care
Appliance Movement
Thoroughly clean your plank floor prior to moving appliances to prevent scratching caused by sand or grit.
Place a clean piece of carpet, pile side down, under the appliance and move the appliance slowly across the floor into position. If moving the appliance for service or cleaning, roll the appliance onto a piece of Masonite or Luan to prevent grooving or tracking of the floor.Furniture Movement
Thoroughly clean your plank floor prior to moving furniture to prevent scratching caused by sand or grit.
As your furniture may have inadequate, damaged or missing protective slides, we strongly suggest removal and replacement of all existing slides with high quality felt furniture glides. This prevents damage from initial furniture placement as well as damage from furniture movement for cleaning and re-arrangement.
Casters can cause severe damage to plank flooring. Though precautions cannot ensure casters will not damage your plank flooring, we strongly suggest replacement of all steel, wood and plastic casters with high quality, non-marking, soft rubber or Polyurethane casters as well as the use of rubber backed protective roller mats.Door Mats and Rugs
Place quality rubber backed (not jute) door mats, both on the inside and outside of each exterior door location of your home to protect your plank floors from abrasive sand and grit.
Placing rugs in high traffic areas will help preserve the gloss level of your plank flooring.Humidity Control
To prevent damage to your plank flooring, maintain the humidity in your home between 35% and 60%. To maintain the recommended humidity levels, Frame Industries, Inc. strongly suggests year around humidity control via a humidifier and dehumidifier. Use of a Hygrometer is also essential in maintaining correct humidity control.
Cleaning Care
Liquids and Water
Water and other liquids can cause your floor to warp and buckle. Never use a steam cleaner and never mop your floor with water. Make sure to wipe up spills immediately.Grit and Sharps
Sand, dust and dirt can scratch your plank floor. Clean sand and dirt from your plank flooring immediately, especially sand and dirt located in high traffic areas.Wax and Oil
Your plank flooring includes an eight-layer polyurethane, no-wax finish. Use of wax, oil or oil soap is as likely to damage your floor, as it is to help. Often these products will make your floors look wonderful after the first application. However, after multiple uses, the product build up becomes cloudy and the beauty and color of your plank floors is lost until the build up is removed.
Damp Sponge
Clean spills and sticky messes with a well-wrung damp sponge, soft cloth or paper towel.Vacuum or Sweep
Vacuum or sweep the floor to remove any sand or grit from the floor surface and beveled edges between the boards.
If vacuuming, do not use a vacuum with a rug beater bar, use an electric broom or stick vacuum.
If sweeping, use a broom with soft bristles.Dry and Damp Dusting
Dry dust your floors with a micro fiber dust mop.
To damp dust, lightly mist the section of floor you are damp dusting with a quality hardwood floor cleaner or window cleaner.
PLANK REPLACEMENT GUIDE click for details
Over time, a plank or several planks may become damaged beyond acceptable appearance. In that event, the most effective visual repair is to replace the damaged plank(s). The following guide illustrates how to properly remove and replace a damaged plank.
**Plank replacement is a moderate to difficult procedure that should only be attempted by a skilled craftsman or an individual confident in their woodworking abilities**
Required tools and materials:
Circular Saw
Fine Tooth Carbide Blade (new)
Straight Edge
Pry Bar (small)
Wood Chisel
Utility Knife
Sanding Block (120 grit sandpaper)
Color Match Stain Marker (if required)
Clear Semi-gloss Polyurethane
Foam Paint Brush (small)
Wood Adhesive
NOTE: The Festool saw and guide channel used in this illustration is the best tool set-up for this repair. http://www.festoolusa.com
Step 1
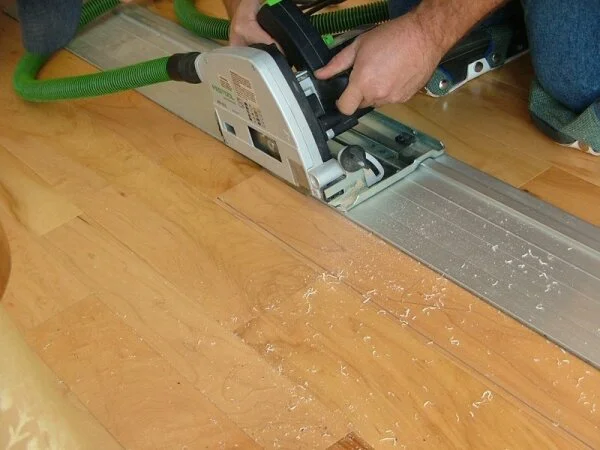
With a straight edge, mark lines 1/4” "inside" of both long edges of the damaged plank stopping 1/4" from the short edge at each end. With the circular saw set at 3/4" depth, plunge the blade through the plank and follow the marked line. Repeat the cut on the opposite line. For best results, use a saw guide to prevent miscuts.
Step 3
Step 2
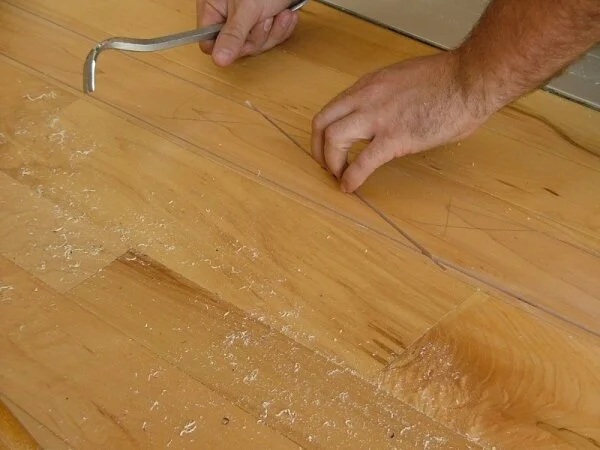
At an angle, plunge cut across the damaged plank taking special care to avoid damaging the adjacent planks.


Carefully, prying upward, remove both halves of the damaged plank. Cracking and splintering of the damaged plank may be seen and heard as this step is performed.
Step 4

With a wood chisel, remove any left over pieces of the damaged plank from the grooves and tongues of the adjacent planks. With a utility knife, cut away all visible underlayment, exposing the subfloor.
Step 5
Cut the replacement plank to the exact length of the open space. Cut away the bottom strip of wood that creates the groove and approximately 1/8" of the tongue. With a sanding block, create a bevel on the cut end(s) of the replacement plank that match the bevels of the side edges. If your floor has a stain color, stain the new bevel(s) with a stain marker that matches the plank color. After allowing the stain to dry, carefully apply two light coats of polyurethane to the new bevel(s) with a small foam brush.
Step 6
Thoroughly clean the opening of dirt and saw dust. Partially dry fit the replacement plank to ensure fit. If the replacement plank fits properly, remove it from the opening, spread an even layer of wood adhesive across the entire surface of the exposed subfloor and fit the plank in place. Place the legs of a chair on the replacement plank and weight it with books until the adhesive cures. DO NOT USE UNSIGHTLY FACE NAILS TO ANCHOR THE PLANK.
FINISH INFORMATION click for details
· UV curing is a photochemical hardening process as opposed to an evaporative drying process.
· With no evaporation, UV finishes are 100% solids based as opposed to water or oil based.
· Our finish is a mix of urethane and acrylic.
· The urethane allows the finish to flex and maintain adhesion during expansion and contraction.
· The acrylic increases the hardness of the finish.
· We apply 7 layers of finish to our satin or eggshell gloss level products.
· We apply 6 layers of finish to our matte gloss level products.
· When completed, these layers bond into a single layer of finish.
· Aluminum Oxide is included in the top layer of all our products.
· Aluminum Oxide adds additional abrasion resistance to our flooring products.
· There is no formaldehyde in our finish, and it does not outgas VOCs.
STAIN MATCHING click for details
Can I get stain to match my flooring?
Our flooring stain is not consumer friendly as it is UV-cured. This means it would stay tacky for a very long time without a UV oven. For this reason we cannot sell our stain.
Can you give me the stain formula to use with a stain like Minwax?
If you are not comfortable matching the stain yourself, we highly recommend getting it matched at your local Sherwin-Williams store. Even with a stain formula in hand, there are many factors out of our control that affect the quality of the color match: the color of specific pieces of wood, whether the application is with a sponge/rag/brush/spray, which grit sandpaper is used to open up grain or in between coats, the type of finish you choose can change the color, as well as any human error in mixing the stain formula.
WARRANTY click for details
FRAME INDUSTRIES, INC.
LIMITED RESIDENTIAL WARRANTY
FOR
CHELSEA PLANK® FLOORING
PRE-INSTALLATION INSPECTION
Frame Industries has developed and utilizes a stringent quality control program in the manufacture of Chelsea Plank® Flooring. It is important to understand that these products are produced from natural materials containing a wide variety of color, grain, and character. The products are produced using a high-speed manufacturing process and therefore it is possible each box may contain a small percentage of defects (normally less than 1%). Due to these facts, the flooring installer should inspect each plank with regard to defects or any undesirable character that the end customer may not want. The actual flooring to be installed should be reviewed with the installer and customer both present. Any defective planks may be returned for replacement with the dealer where the flooring was purchased.
VARIATION BETWEEN LOTS
It is possible a single job can contain flooring from two or more runs or lots. As different batches of lumber will contain different amounts of character and/or color within the same grade, different lots may contain varying concentrations of color and/or character. When an installation includes multiple lot numbers, it is imperative the installer verify the different lot numbers will blend harmoniously, prior to installation.
35 YEAR LIMITED FINISH WARRANTY
Frame Industries, Inc. warrants Chelsea Plank® Flooring with factory finish will not wear through to, or delaminate from, the wood for a period of 35 years under normal residential conditions provided the Frame Industries, Inc. maintenance and care guidelines are followed and subject to the limitations and exclusions shown below.
WARRANTY LIMITATIONS AND EXCLUSIONS
Pre-Installation Inspection
Failure to perform the Pre-Installation Inspection, as defined above, voids this warranty.
Installation
Frame Industries, Inc. is not responsible for the installation of Chelsea Plank® Flooring. Please refer to the National Wood Flooring Association Installation Guidelines for complete installation instructions.
Water Damage
Damage caused by the introduction of moisture, to include but not limited to, wet mopping, flooding, overflowing sinks or toilets, leaking plumbing, leaking appliances (such as dishwashers, refrigerators or washing machines) is not covered by this warranty.
Abuse and Misuse
Damage caused by, but not limited to, impact or scrapping by hard or sharp objects, use of oil soaps, liquid or solid wax products, abrasive cleaners or the use of finish damaging cleaning equipment, (vacuum cleaners with beater bars, steam cleaners, etc.) is not covered by this warranty.
Storage
Chelsea Plank® Flooring must be transported and stored in a dry environment. Additionally, it should never be stored on a concrete surface.
Environmental Conditions
Home humidity levels above 60% or below 35% over a prolonged period of time will potentially cause irreversible damage to solid plank flooring thus voiding this warranty. In addition, color changes caused by direct sunlight and color variations caused by rugs and furniture, otherwise known as “shadowing”, are not covered by this warranty.
Gloss
This warranty does not cover reduction of gloss levels or scratches caused by use.
Gapping, Cupping and Buckling
As Chelsea Plank® Flooring is manufactured from solid hardwood, this warranty does not cover the normal expansion and contraction caused by seasonal changes or cupping and/or buckling caused by excessive moisture or humidity.
Material Designation
This warranty does not apply to products that were sold as “seconds”, “odd lots” or on an “as is” basis.
WARRANTED OBLIGATIONS
Under this warranty, the sole obligation and liability of Frame Industries, Inc. is the replacement of flooring material proven to be defective with respect to Chelsea Plank Flooring grading, milling and finish standards. In no circumstances is Frame Industries, Inc. responsible or liable for installation costs, or any labor costs, even if the floor is proven to be defective. In no way does this warranty assume liability for any claim of indirect, incidental or consequential damages.
CLAIMS UNDER THIS WARRANTY
Claims must be filed within the coverage period and include a copy of the original invoice. Frame Industries, Inc. reserves the right to have a designated Frame Industries, Inc. representative or certified National Wood Flooring Association representative inspect the floors and, if required, remove samples of the flooring for technical analysis.
If you need to file a claim under this warranty, first contact your Chelsea Plank® Flooring retailer. If for some reason, your retailer is unable to satisfy your claim, you may contact us at the following address:
Frame Industries, Inc.
740 West Industrial Drive
Chelsea, MI 48118
Any controversy or dispute arising under this Warranty shall be resolved by arbitration conducted in Ann Arbor, Michigan, in accordance with the rules of the American Arbitration Association, and judgment on the award rendered by the arbitrators may be entered in any court having jurisdiction thereof.
THERE ARE NO WARRANTIES WHICH EXTEND BEYOND THE DESCRIPTION
ON THE FACE HEREOF OR AS OTHERWISE SET FORTH HEREIN. NO OTHER
WARRANTIES, EXPRESSED OR IMPLIED, BY OPERATION OF LAW OR OTHERWISE ARE MADE, INCLUDING BUT NOT LIMITED TO, MERCHANTABILITY OR FITNESS FOR A PARTICULAR PURPOSE. UNDER NO CIRCUMSTANCES SHALL FRAME INDUSTRIES, INC. BE LIABLE FOR ANY LOSS OR DAMAGE ARISING FROM THE PURCHASE, USE, OR INABILITY TO USE THIS PRODUCT, FOR ANY SPECIAL, INDIRECT, INCIDENTAL OR CONSEQUENTIAL DAMAGES. SOME STATES DO NOT ALLOW LIMITATIONS ON HOW LONG AN IMPLIED WARRANTY LASTS, OR THE EXCLUSION OR LIMITATION OF INCIDENTAL OR CONSEQUENTIAL DAMAGES, SO THE ABOVE LIMITATIONS MAY NOT APPLY TO YOU. THIS WARRANTY GIVES YOU SPECIFIC LEGAL RIGHTS. YOU MAY ALSO HAVE OTHER RIGHTS, WHICH VARY FROM STATE TO STATE. THUS, IT IS IMPORTANT TO RETAIN THIS WARRANTY INFORMATION. NO INSTALLER, RETAILER, DISTRIBUTOR, AGENT, OR EMPLOYEE OF FRAME INDUSTRIES, INC. HAS THE AUTHORITY TO INCREASE OR ALTER THE OBLIGATIONS OR LIMITATIONS OF THIS WARRANTY.
01-01-2023
FLOORING AND MOLDING PROFILES click for details
PACKAGING SPECIFICATIONS click for details
Chelsea Plank Flooring is packaged by individual width.
Standard Plank:
3” - 10.5sf - 42lf (Carton: 6-1/2” x 2-1/2” x 7’6”)
4” - 14sf - 42lf (Carton: 8-1/2” x 2-1/2” x 7’6”)
5” - 17.5sf - 42lf (Carton: 5-1/2” x 4-3/4” x 7’6”)
6” - 21sf - 42lf (Carton: 6-1/2” x 4-3/4” x 7’6”)
3”D - 21sf - 84lf (Carton: 6-1/2” x 4-3/4” x 7’6”) discontinued box size
2-1/4” - 21sf - 112lf (Carton: 9-1/2” x 4-3/4” x 7’6”) discontinued box size
2-1/4” - 16sf - 84lf (Carton: 9-1/2” x 2-1/2” x 7’6”)
Carton count by pallet: 3”=48, 4”=50, 5”=49, 6”=36, 3”D=36, 2-1/4”=40
CARTON COUNT CALCULATOR click for details
COLOR CROSSOVER CHART click for details